What Is React Remix? Should It Be Your Next Framework?
Understand the pros and cons of adopting this new technology, with code examples.
We’ve all seen it happen before: something new becomes old until it eventually becomes new again. Trends appear, vanish, and come back again, maybe reinvented, probably with improvements, but the gist will be there. This is the wheel of life.
React Remix is the “back to basics” strategy for web developers: a toast to the golden era (for some people) of web development—where everything was HTML, and PHP provided the extra spice.
Whether people miss the HTML + PHP combo or not is debatable, but the principles behind it still stand, as we are going to see in a moment. I’ve discussed at length the evolution of web development from static files, to dynamic content, then back to static plus dynamic. Now, React Remix is a new approach, revitalizing the quest for server-side generated content. In this article we will learn what Remix is trying to solve, how it is doing it, what are the consequences (good and bad) of the choices made, and, in the end, will create a small project to outline some of the principles discussed in practice.
Back to Basics
Let us understand how websites were created before, so we can better understand what React Remix is trying to solve. In the early days, web pages (nobody dared to call them “applications” back then) would be a collection of plain HTML. If data needed to change, developers would add a form that would be responsible for sending that data to the server.
Eventually, however, this data would need to be displayed. In order to do that, frameworks were created to allow developers to insert pieces of dynamic data into a static template. This way, users would have up-to-date information and developers would sleep tight at night without needing to manually refresh the content.
PHP was one of the go-to languages for this technique, and anyone who created websites up until the early 2010s probably had to deal with the infamous PHP tags in an HTML file, where dynamic content would be inserted after being read from an external source like a database or API.
However, things started to go south in PHP-land as developers started to praise a pattern called “separation of concerns”. Apparently, mixing PHP, HTML, JavaScript, and CSS in the same file became a burden at some point, and using PHP for templating lost its appeal, as other JavaScript frameworks like Node and React became more popular, and new professions like front-end and back-end developer surged.

But the wheel of life (or should I say “web development”) spun and developers started to think that splitting a single page into multiple files is too cumbersome, and why not add CSS-in-JS and have loaders to load the dynamic information and actions to mutate data. And in this spirit, React Remix emerged.
In short, React Remix is a modern attempt—using newer techniques and an opinionated framework—to rescue the basics of web development. It is less dependent on JavaScript, semantically groups code, and prioritizes performance.
Is it really necessary?
A fair question is if we really need to make this U-turn pattern-wise, especially now that React has conquered its space as the frontend framework king. Here it’s important to know that React Remix, if you haven’t noticed yet, is built on top of React and therefore not a total disruption of the current patterns.
However, it does change some paradigms as we are going to explore further in a moment. But while React is an unopinionated frontend-only library, React Remix (as other competitors like Next.js and Gatsby) aims to bring React to the server-side rendering (SSR) realm, and therefore it needs to be analyzed under the assumption that this is something that you want.
In other words, React Remix helps developers who want the benefits of server-side rendering. React started as the “V” of the MVC (Model-View-Controller). React Remix is the whole package, reshaped as an evolution of the old ASP.net and PHP frameworks.
For a more formal definition, according to Bejamas, Remix is a server-side rendering JavaScript framework built on React that allows us to build full-stack web applications due to its frontend and server-side capabilities.
Why pick React Remix?
We already discussed how React Remix is different from a plain React application. But as a developer, why would you decide to pick React Remix for your next project over another framework?
Here it’s important to say that if all you are looking for is SSR, there are senior frameworks such as Next.js and Gatsby on the block. And if what you need is static site generation (SSG), then React Remix is probably not for you.
SSR vs SSG
Right, but what the heck are all those acronyms anyway? I won’t go too deep, but SSR stands for server-side rendering, whereas SSG means static site generation. Both are alternatives to SPAs, or single-page applications, which React is by default.
In SSR applications, pages are templated like PHP in the golden days, and upon request, fresher information is inserted – or in more technical terms, data is added at run time. SSG, however, fills the templates at build time, i.e., when the HTML page is being generated. By doing that, delivery time becomes way faster, although you need to spend more time building your application.
Which approach to choose will depend on your requirements, but as of today, I’d argue that Remix won’t probably be a fit for SSG applications, but is a contender for SSR. But does it win the contest?

As always, it depends. Bear in mind that the framework is very new and subject to change, and also that it tries to do less things and therefore you can eventually hit a roadblock. But if you have a defined scope and a clear understanding of your requirements, by all means, give it a shot. It has some fun paradigms, as we are going to see.
React Remix key features & benefits
Alright, up until now we have discussed what React Remix is and what it tries to solve from a conceptual standpoint. It’s time for us to understand what all this fuss means in practice, and later, to see some code in action.
Nested Routes
The creators of React Remix were also the minds behind react-router, a well-known library for routing applications. Remix has a very clever scheme of nested routes where you can compose routes pretty much like you can compose components. This is very convenient for the traditional “list-view” application, where you select an item of a list in order to inspect its details.
Error Boundaries
It has happened to all of us – a web application tries to load, something goes south, and the whole page crashes. React Remix argues it doesn’t need to be this way. Would you short-circuit the whole component if a child breaks? Then why do that in your application? With Error Boundaries, you have localized points of failure, so you don’t disrupt the functioning of your app because only one thing went wrong.
Loaders
Static sites became dynamic for a reason, and that was because static is boring. However, fetching all data dynamically compromises your app’s performance, impacts SEO, and so on. Remember how SSR websites fill the gaps (the templates) at run time? React Remix makes this work by using loaders, special functions that load the dynamic information from somewhere (a database, an API) when the page is served. Loaders are added in your route file, so you know exactly what information is being retrieved at the time. A handy useLoaderData hook is provided, so your component is shielded from the extra complexity.
Actions
Actions are the hyperactive brothers of loaders, the ones responsible for mutating data. We give the name of “mutation” to every action that changes data, like inserting, editing, or deleting. Like loaders, you can add an action function in your Remix routes in order to intercept form data, and handle them as you please.
JavaScript-free zone
Because actions are HTML forms and Remix can handle loading states for you, JavaScript becomes henceforth a luxury. That means that you can have a modern framework, using the latest technologies, and still be resilient to JavaScript not being available. In an era of JavaScript abuse, it is truly remarkable.
Full-stack framework
React Remix does an awesome job in closing the gap between frontend and backend, to the point that it becomes really fuzzy where one ends and the other starts. This has drawbacks, but also great advantages. Your codebase is unique, code is relatively grouped together, and development is smooth.
Criticism of React Remix
React Remix is an opinionated framework and, as such, has benefits and drawbacks. Although drawbacks can be objective or subjective, some points are not debatable. For example, the fact that Remix doesn’t support SSG out-of-the-box and therefore shouldn’t be used if that’s your primary goal. However, because this is an opinionated article, I’ll lay down what I think are the crucial points when deciding whether React Remix is the right tool for the job.

Nested routes for whom?
Let’s be honest: nested routes are nice, but do you really need them? How many times are they useful enough that it warrants the choice? Granted, being able to preload chunks of your app is a nice addition, but you need to think if this is a feature applicable to your application.
Do you need Error Boundaries?
It is nice that your app doesn’t explode when a tiny chunk fails, but the question is: how often does a tiny chunk fail and your user is still able to pull some value out of it? It’s definitely important in critical parts of your app, but let’s face it, most of the time when something fails on a web page, the whole thing will need to be refreshed.
Not very RESTful
If you come from a RESTful framework like Express, you probably will be a bit shocked that traditional verbs like PUT, PATCH, and DELETE are not encouraged. That’s because HTML forms only support GET and POST verbs, and therefore you lose a bit of Remix’s magic by using them (and it looks a bit hacky anyway). Personally, I think this is one of the main disadvantages, as it goes against API development best practices.
Do you really (I mean, really) expect to be functional without JavaScript?
Oftentimes I see people bragging that they browse the web with JavaScript disabled and can’t help but wonder from what planet they come from. Jokes aside, do you really want to account for those freaks extra sensitive people?
I understand the argument that too much JavaScript is bad, and often unnecessary, but zero seems a bit drastic to me. If that’s not a must for you, probably all the “we work without JavaScript” propaganda won’t make a difference for you anyway.
RIP Separation of Concerns
I’m old enough to remember people praising “separation of concerns” as some sort of holy grail of web development. You have small, self-contained files, each doing its own job, like bees in a beehive. What’s so wrong with that? If you are like me and like everything in its own file, React Remix may not be for you.
CSS is cumbersome
The approach for styling used in Remix is a bit odd, but not unexpected (remember we post requests using a form). In their API, you need to add a <link> tag, as you typically do with HTML. One of the benefits is that you can “control your network tab” and improve performance by importing only the required CSS in the most efficient manner. I then reply: do you want to control your network tab?
Also, your favorite CSS framework might not be supported just yet. Be mindful of that before you migrate all your codebase.
React Remix in practice
The time has come for us to quit the babble and start what is really important: the code. The goal here is not to go in-depth on all React Remix features, but rather to provide a brief overview of the features discussed so far.
To achieve that, we are going to build a simple app called Remix LotR (code available in GitHub), leveraging this awesome Lord of the Rings API. I chose this example because it is (arguably) not only fun but also helps us understand some of the fundamentals of the framework. I hope that by using this project as a starting point, you can continue your React Remix studies and decide whether it is the right framework for you.
One Remix app to rule them all
If you want to follow along with this tutorial, head over to the LotR API website and claim your key. There are some rate limits but it should be more than enough for our project.
Also, make sure that you have React Remix set up and a new project created as described in their Quickstart guide. To make things simple, select when prompted since deploying is out of the scope of today’s project.
We will build a tree-view-like app where the Lord of the Rings characters will be listed and, upon selection, their details will show up. When a character is “opened”, you will also be able to load their quotes (if any). Although a bit silly, this is a clear way to understand how nested routes work and how you can use loaders to serve data to the client.
Your first route
If you have already created a Remix project, you will see the framework has created some boilerplate for us. The most important piece is the folder app/routes, where all pages live. Open index.jsx and add a Link to the page we are going to create soon.
import { Link } from "remix";

export default function Index() {
  return (
    <div style={{ fontFamily: "system-ui, sans-serif", lineHeight: "1.4" }}>
      <h1>Welcome to Remix!</h1>
      <ul>
        {/* code */}
        <li>
          <Link to="/characters">Characters</Link>
        </li>
      </ul>
    </div>
  );
}
The highlighted portion is what we need to add. Feel free to remove the rest if you want. For now, the important piece is that, when linking to an internal page, we need to import the Link component from remix. This is important because this way Remix can preload the next route and improve your app’s performance.
Alright, we added a link but the route doesn’t exist yet. Let’s fix this by creating a file characters.jsx in app/routes. This should be enough for now:
export default function Characters() {
  return (
    <main>
      <h1>Characters</h1>
    </main>
  );
}
Save your work, then start the server by running npm run dev and notice that the link works. Congratulations, you have created your first route from scratch!
Listing all characters
Our app is rather lame so far. Fear not, we are going to spice things up a little right now.
The goal of this page is to list all characters in the Lord of the Rings series as cataloged by the API. Looking at the docs, you see that the /characters endpoint is what we want.
The way React Remix adopts to load data into a route is called… well, loaders. You can easily test it by adding a function called loader in the route:
import { useLoaderData } from "remix";

export const loader = async () => {
  const data = [“Gandalf”, “Frodo”, “Aragorn”];
  return data;
};

export default function Characters() {
  const data = useLoaderData();
  console.log(data);
  return (
    <main>
      <h1>Characters</h1>
    </main>
  );
}
Add the highlight pieces and check how the data variable defined inside the loader function becomes available in the route component through the useLoaderData hook. This is one of the magical things about Remix: the data source and the actual component using it are coupled together.
Now, let’s scrap the dummy data and actually make the API connection. For that, make sure you have the API key and the base path set. In order to make things cleaner, create a .env file at the root and add the following data:
BASE_PATH="insert API base path"
API_KEY="insert an API key from https://the-one-api.dev/"
Now you will be able to safely use the variables using process.env. Cool, right?
Let’s then get back to the loader function and hook it properly:
export const loader = async () => {
  const response = await fetch(
    `${process.env.BASE_PATH}/character?sort=name:asc`,
    {
      headers: {
        Authorization: `Bearer ${process.env.API_KEY}`,
      },
    }
  );
  const data = await response.json();
  return data;
};
And that’s it! Check how the actual data is available in your route component.
Adding a nested route
Everything is going according to the plan. Now, we want a character’s details to be expanded by clicking on their name. Notice that the route right now is /characters so we’ll need a nested route in the format /characters/$id.
Let us then get back to characters.jsx and link them properly:
import { useState } from "react";
import { Link, Outlet, useLoaderData } from "remix";
export const loader = async () => {
/* code */
};
export default function Characters() {
const data = useLoaderData();
const [filter, setFilter] = useState("");
return (
<main>
<h1>Characters</h1>
<hr />
<div style={{ display: "flex", marginTop: "40px" }}>
<div>
<label>
<strong>Filter:</strong>
</label>
<input value={filter} onChange={(e) => setFilter(e.target.value)} />
<ul>
{data.docs
.filter((d) =>
filter === ""
? true
: d.name.toLowerCase().includes(filter.toLowerCase())
)
.map((d) => (
<Link key={d._id} to={d._id} style={{ display: "block" }}>
{d.name}
</Link>
))}
</ul>
</div>
<div
style={{
position: "sticky",
top: "20px",
marginLeft: "20px",
alignSelf: "flex-start",
}}
>
<Outlet />
</div>
</div>
</main>
);
}We added a client-side filter to help while looking for a specific character. Notice how it’s React plain and simple. Also, we added a Link component for every character, using the variable _id as an identifier. The Outlet component is what houses the nested component that will be created next.
We can interpret routes’ chunks as variables as long as we prefix them with a $. That’s what we are going to do now – create a new folder /app/routes/characters and inside it a file $id.jsx. This will be enough for Remix to understand that a route like /characters/123 will expose a variable called id whose value will be 123.
Open $id.jsx and add the following:
import { useLoaderData } from "remix";

export const loader = async ({ params: { id } }) => {
  const response = await fetch(`${process.env.BASE_PATH}/character/${id}`, {
    headers: {
      Authorization: `Bearer ${process.env.API_KEY}`,
    },
  });
  const data = await response.json();
  return data;
};

export default function Character() {
  const data = useLoaderData();
  const character = data.docs[0];
  return (
    <div style={{ display: "flex" }}>
      <div style={{ minWidth: "300px" }}>
        <h1>{character.name}</h1>
        <div>
          <b>Birth</b>: {character.birth}
        </div>
        <div>
          <b>Death</b>: {character.death}
        </div>
        <div>
          <b>Gender</b>: {character.gender}
        </div>
        <div>
          <b>Hair</b>: {character.hair}
        </div>
        <div>
          <b>Height</b>: {character.height}
        </div>
        <div>
          <b>Race</b>: {character.race}
        </div>
        <div>
          <b>Realm</b>: {character.realm}
        </div>
        <div>
          <b>Spouse</b>: {character.spouse}
        </div>
        <div>
          <a href={character.wikiUrl}>Wiki URL</a>
        </div>
      </div>
    </div>
  );
}
Notice how we destructured { params: { id } } in order to have access to the id in the server. Then, we used the API the same way as before to get the details, and useLoaderData again to access them in the component. Note that because wikiUrl is an external link, we didn’t use the Link component but rather a plain old anchor tag.
Play a bit with what we have right now. Notice how clicking on a character name instantly opens their details, and how hitting back in the browser changes the URL and also the content. This is the magic of nesting routes, rendered from the Outlet component.

How much nesting is too much nesting?
Let’s explore a bit further by adding another nesting level. Is that even possible? Of course, it is! And the good news is that there’s nothing new to us.
The next goal is to create a link that will open the quotes for a given character. The route will be /characters/123/quotes and this suggests that we follow the same pattern as before: create a folder with the name of the parent route (in this case app/routes/characters/$id) and inside a file with the name of the desired route: quotes.jsx.
Open quotes.jsx and add the following:
import { useLoaderData } from "remix";

export const loader = async ({ params: { id } }) => {
  const response = await fetch(
    `${process.env.BASE_PATH}/character/${id}/quote`,
    {
      headers: {
        Authorization: `Bearer ${process.env.API_KEY}`,
      },
    }
  );
  const data = await response.json();
  return data;
};

export default function Character() {
  const data = useLoaderData();
  return (
    <div>
      <h3>Quotes</h3>
      {data.docs.length > 0 ? (
        <ul>
          {data.docs.map((q) => (
            <li key={q._id}>{q.dialog}</li>
          ))}
        </ul>
      ) : (
        <div>No quotes found.</div>
      )}
    </div>
  );
}
Alright! Nothing new to see here. Go back to $id.jsx and add the missing link:
import { useLoaderData, Link } from "remix";

export const loader = async ({ params: { id } }) => {
  {/* code */}
};

export default function Character() {
        {/* code */}
        <div style={{ marginTop: "20px" }}>
          <Link to="quotes">See quotes</Link>
        </div>
      </div>
    </div>
  );
}
Save your work, click on the Link, and… something’s off. Nothing is showing up!
Why is that happening? Well, every time we want to make a nested route, we need to use the Outlet component. And as you can see, a single Outlet component is not enough – you need one for each desired nested level.
Let’s fix the issue by adding another Outlet component, this time in $id.jsx:
import { useLoaderData, Link, Outlet } from "remix";

export const loader = async ({ params: { id } }) => {
  {/* code */}
};

export default function Character() {
      {/* code */}
      <div
        style={{
          position: "sticky",
          top: "20px",
          marginLeft: "20px",
          alignSelf: "flex-start",
        }}
      >
        <Outlet />
      </div>
    </div>
  );
}
Try again and see how it works!

Error boundaries in action
The last thing that I’d like to go over today is called Error Boundaries. Simply put, if something breaks in your app, the closest boundary will “intercept” it, preventing a deeply nested mistake from bubbling up the whole application. Once we are talking about a two-level nested route, it’s important that we prevent an issue in the quotes route, for example, from blowing up the whole experience.
Let’s test it by adding a function called ErrorBoundary and by simulating an error in our code:
import { useLoaderData } from "remix";
export const loader = async ({ params: { id } }) => {
const response = await fetch(
`${process.env.BASE_PATH}/character/${id}/quote`,
{
headers: {
Authorization: `Bearer ${process.env.API_KEY}`,
},
}
);
const data = await response.json();
return data / 1000; // Generate some random error
};
export default function Character() {
{/* code */}
}
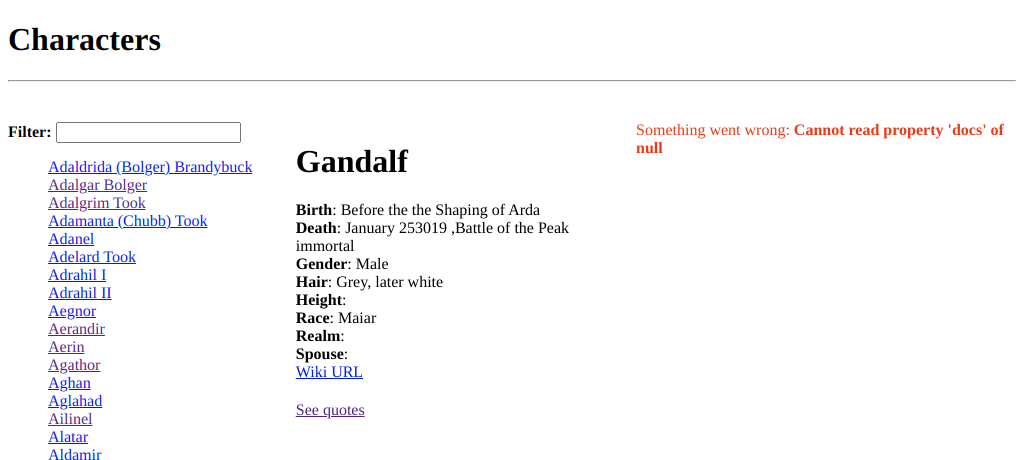
export function ErrorBoundary({ error }) {
console.error(error);
return (
<div style={{ color: "red" }}>
Something went wrong: <strong>{error.message}</strong>
</div>
);
}Now, select a character, click on “See quotes”, and check how only the quotes part is broken.
Conclusion
React Remix is definitely an interesting framework and a new paradigm, at least for modern standards. It brings back some old web development principles, which is by no means a bad thing.
That said, the technology is fairly new and things are subject to change. Therefore, I’d be cautious in adopting this stack in production. Nonetheless, it’s worth keeping an eye on it and how it will develop in the future.
One more quick thing to note, being an SSR framework Remix isn’t an ideal choice for a production app like ours. This is because every page hit will ping the API again, with data that won’t change often, and therefore stress the API server unnecessarily (on the peril of being rate-limited). An SSG framework like Gatsby or Next would probably be a better choice. However, had our data been more dynamic (a stock price, for example), this approach would work better. Thus understanding the business needs of your app is crucial when determining whether React Remix is adequate for you.