How to incrementally migrate a Gatsby app to TypeScript
Learn how you can safely adopt TypeScript in your project, right now, without major changes.

It shouldn’t come as a surprise that TypeScript is getting more traction among developers by the day. Support for it has grown considerably, as well as the community and number of projects adopting this technology.
It wasn’t always like that, though. Web developers have been burned before by hot technologies that disappeared, and it’s only fair that some in the community are more skeptical about big changes. In fact, the Lindy effect proposes that every day a piece of technology continues to survive, the longer it is expected to exist.
The goal of this article is not to convince you to migrate to TypeScript; I assume that if you are here, you have already been sold on the benefits of static typing in a dynamic language like JavaScript. However, if you are like me, you probably have been delaying the migration, fearful of the amount of work needed to set it in motion.
Well, fear no more! I’ve done the heavy lifting for you. In this article, you will learn how to adopt TypeScript incrementally, so you can have a smooth transition and a good night of sleep after work.
Why incrementally?
Why do we have “incrementally” in the title of this article? Isn’t that just delaying the inevitable? Why not perform a full migration at once?
Those are valid points, and in some cases, they can even be the most advisable. However, I am assuming you have a somewhat large project, big enough that using a codemod won’t work (or will require too much workaround).
Or maybe you work on a specific part of an app in a larger team and want to run a pilot before doing the big change.
In all cases, there are valid scenarios where one would take the cautionary road first. And even though you will find a bunch of codemods or migration methods that claim to be seamless, the reality is that if your project has some complexity, it might not be as easy as they preach.
However, to offer a counterpoint, the folks at Stripe seem to disagree with me. They just recently published a piece claiming to have migrated millions of lines of code to TypeScript. If you are feeling adventurous, it’s worth checking it out!
How to set up TypeScript in an existing Gatsby app
Alright, for today’s experiment we’ll assume you already have a Gatsby app and want to perform a gradual migration.
Remember that if you are creating a new project today, Gatsby already supports TypeScript as the main language from the beginning. Unfortunately, that’s not the case for most projects that were bootstrapped in older versions of Gatsby, so we are going to take a different route.
The Gatsby docs already present a good guide on how to migrate. However, there are a few tweaks that we need to do in order to get it up and running smoothly.
Change your .js files to .tsx
The easier part is to change all components you want to migrate to .tsx, or create new ones in this format. No work is needed on Gatsby’s side for this to work! That’s pretty neat.
Install dependencies
There are, however, some libraries to be installed. Make sure you add them to your devDependencies:
$ npm i –save-dev @types/node @types/react @types/react-dom typescript Generate .tsconfig
TypeScript has a config file called .tsconfig, which is hugely customizable and will vary from project to project. However, there are some specific changes we need to make in order to allow TypeScript and JavaScript to coexist in harmony, as this is a requirement for everyone to adopt TS gradually.
An example of a working .tsconfig is as follows. Make sure to add it to the root folder of your project:
{
  "compilerOptions": {
    "target": "es2016",
    "jsx": "react",
    "module": "commonjs",
    "allowJs": true,
    "outDir": "./dist",
    "esModuleInterop": true,
    "forceConsistentCasingInFileNames": true,
    "strict": true,
    "skipLibCheck": true
  },
  "exclude": ["node_modules", "public", ".cache"]
}
You can also check an example on this public repo in GitHub.
Some of the needed configs are as follows:
- Add
"jsx": "react"to make sure the compiler knows we are in a React project - Set
allowJs: true; once JavaScript and TypeScript need to coexist, this flag should be turned on - Add
outDir: "./dist", which makes VS Code happy and prevents unwanted errors
Declaring globals
If you got this far, you already have most of your setup working. However, there are still some rough edges.
The most obvious is about CSS modules; Gatsby works with CSS modules by default and we need to let TypeScript be happy about it. If you use SVGs as components as described here, this will also be useful.
At the src folder of your project, create a file called globals.d.ts and add the following:
declare module "*.module.css";
declare module "*.module.scss";
declare module "*.svg" {
  const content: string;
  export default content;
}
This will make sure that both CSS and SVG are treated and handled as modules.
Again, you can check a working example in GitHub.
If you are using ESLint, it may complain about .d.ts files. In this case, you can disable the linter in such extensions.
Typing using prop types
One of the main advantages of TypeScript is to allow static typing in JavaScript. When developing with React, this is much welcomed, because it makes it harder for us to add non-existing props or even pass the wrong variable.
Before TypeScript was a thing, the React team popularized typechecking with prop types.
Prop types were an intermediary step between no validation and strict typing. With prop types, developers could list all props in a given component, their corresponding type, and whether they are optional or mandatory.
For example, suppose we have a component that receives a prop called magicNumber, which of course should have the type number:
import PropTypes from 'prop-types'

const MyComponent = ({ magicNumber }) => { … }

MyComponent.propTypes = {
  magicNumber: PropTypes.number.isRequired
}
Suppose then that we render MyComponent but forget to pass magicNumber as prop, or pass a string instead. We would see a warning like this in the console, when in dev mode:

However, there would be no static validation, and it’s easy to overlook this kind of error in bigger components or larger projects. Also, we can add a prop but forget to set its type (there are some linters that help you with that though).
Using static typing, you can deprecate prop types in favor of regular TypeScript types:
type Props = {
  magicNumber: number
}

const MyComponent = ({ magicNumber }: Props) => { … }
Now, if you have a .tsx component that renders MyComponent, passing a prop with the wrong type will raise an error at build time:
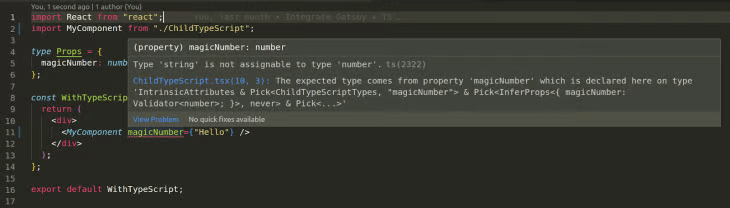
And that’s it! Safer, but less verbose, and comes with all typing benefits. All in all, prop types work but are less powerful than a robust typing strategy like TypeScript. If you want to get deeper on this subject, I recommend you read our preview article on the subject: Comparing TypeScript and PropTypes in React applications.
If you are convinced that static typing is superior to prop types, you should also know that there’s a caveat when ditching prop types in a project that is a hybrid of TypeScript and JavaScript.
Suppose that we have a WithTypeScript.tsx component that renders the TypeScript version of MyComponent. If we try to pass magicNumber="Hello World" this is going to raise an error once there’s a type mismatch, as seen above.
However, if WithTypeScript.tsx receives magicNumber from a parent component written in pure JavaScript and passes it along to MyComponent.tsx, there is no way to validate if the variable is indeed a number. Once the parent component has no typing, no static error will be raised. And because there are no prop types in MyComponent.tsx, no runtime error will be raised. As such, this type mismatch won’t be raised anywhere.
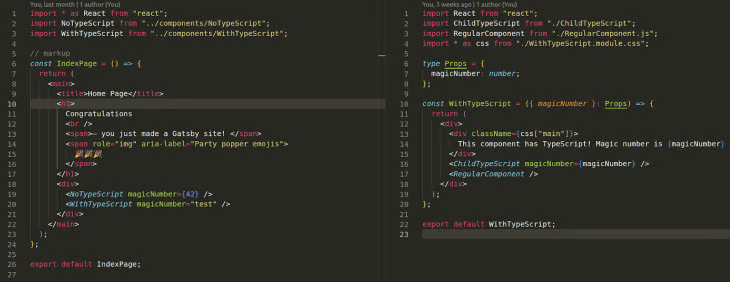
Note how IndexPage.js calls a TypeScript component WithTypeScript.tsx with a wrong prop type. No warning is seen either in the editor or in the browser console.
Bear in mind that this only happens when .js and .tsx components are communicating, which will inevitably happen if you are gradually adopting TypeScript. Fortunately, there’s a solution for it: we can have the best of both worlds by inferring types from prop types in TypeScript components. This way, we retain the prop types, but automatically convert them into types using the function InferProps from the prop-types library.
This would be MyComponent.tsx combining types and prop types:
import React from "react";
import PropTypes, { InferProps } from "prop-types";

const Props = {
  magicNumber: PropTypes.number.isRequired,
};

type MyComponentTypes = InferProps<typeof Props>;

const MyComponent = ({ magicNumber }: MyComponentTypes) => { … };

MyComponent.propTypes = Props;

export default MyComponent;
A full example can be seen here.
The above solution will raise a static error at build time if there’s a type mismatch but also raise a runtime error in the browser console if the wrong type is passed from a .js to a .ts component along the way. The drawback is that your code becomes more verbose.
However, if newer components only communicate with other .ts files, then it should be safe to ditch prop types. Eventually, when the migration is complete, you can completely remove them.
Conclusion
TypeScript is an exceptional tooling, but some developers refrain from adopting it in an existing codebase. This article aimed to elucidate how you can do it safely in your project, right now, without major changes.
While Gatsby in particular supports .tsx files out of the box, you need some workarounds to make your compiler happy considering typical approaches present in Gatsby codebases. Declaring globals for CSS Modules and SVGs are common pain points.
Finally, by having JavaScript communicating with TypeScript, we can’t guarantee that some typing errors won’t be opaque. Because of that, we can leverage the prop-types library and infer the types, getting the best of both worlds until we are safe to deprecate.
All code and examples present in this article can be found in this repo on GitHub. Give it a try!